이벤트 리액트 메뉴얼 : https://reactjs.org/docs/events.html
SyntheticEvent – React
A JavaScript library for building user interfaces
reactjs.org
MyComponent.js - onChange 이벤트 + onKeyPress 이벤트 + onClick 이벤트
import React, { Component } from 'react';

class EventPractice extends Component {

  state = {
    username: '',
    message: ''
  }

  handleChange = (e) => {
    this.setState({
      [e.target.name]: e.target.value
    });
  }

  handleClick = () => {
    alert(this.state.username + ': ' + this.state.message);
    this.setState({
      username: '',
      message: ''
    });
  }

  handleKeyPress = (e) => {
    if (e.key === 'Enter') {
      this.handleClick();
    }
  }


  render() {
    return (
      <div>
        <h1>이벤트 연습</h1>
        <input
          type="text"
          name="username"
          placeholder="유저명"
          value={this.state.username}
          onChange={this.handleChange}
        />
        <input
          type="text"
          name="message"
          placeholder="아무거나 입력해보세요"
          value={this.state.message}
          onChange={this.handleChange}
          onKeyPress={this.handleKeyPress}
        />
        <button onClick={this.handleClick}>확인</button>
      </div>
    );
  }
}

export default EventPractice;
- e 객체는 SyntheticEvent로 웹 브라우저의 네이티브 이벤트를 감싸는 객체
- 이벤트에 실행할 자바스크립트 코드를 전달하는 것이 아니라, 함수 형태의 값을 전달합니다
- 컴포넌트에 임의 메서드를 만들면 기본적으로 this에 접근할 수 없다. 따라서 컴포넌트의 생성자 메서드인 constructor에서 각 메서드를 this와 바인딩해주어야 한다. (아래쪽 코드참조) 이 작업을 하지 않으면 메서드에서 this를 부를때 undefined가 리턴된다.
하지만 바벨의 transform-class-properties 문법을 사용하여 화살표 함수 형태로 메서드를 정의하면 위와같이(위쪽 코드참조) 깔끔하게 정리된다.
construcotr(props){
    super(props);
    this.handleChange = this.handleChange.bind(this);
    this.handleClick = this.handleClick.bind(this);
}
App.js
import React, { Component } from 'react';
import EventPractice from './EventPractice';

class App extends Component {
  render() {
    return (
      <EventPractice/>
    );
  }
}

export default App;ref(refernce) : html에서 id를 사용하여 DOM에 이름을 다는 것처럼 리액트 프로젝트 내부에서 DOM에 이름을 다는 방법
사용시 적절한곳 : DOM을 꼭 직접적으로 건드려야 할 때
ex) - 특정 input에 포커스 주기
- canvas 요소에 그림그리기
- texarea 등에 포커스 주기
- 특정 DOM의 크기를 가져올때
- 특정 ODM에서 스크롤 위치를 가져오거나 설정할 때
- 외부라이브러리(플레이어, 차트, 캐로절 등)을 사용할떄
- id, password 검증
사용법
ref 값으로는 콜백 함수를 전달합니다. 콜백 함수는 reㄹ를 파라미터로 가지며, 콜백 함수 내부에서 컴포넌트의 멤버 변수에 ref를 담는 코드를 작성합니다.
<input ref={(ref) => {this.input=ref}}></input>
App.js에서 컴포넌트에 ref를 주입시 내부의 메서드 및 멤버 변수에 접근 가능합니다.
<ScrollBox ref={(ref) => this.scrollBox = ref}/>
<button onClick={() => this.scrollBox.scrollToBottom()}>
맨 밑으로
</button>
ScrollBox.js
import React, { Component } from 'react';

class ScrollBox extends Component {
  scrollToBottom = () => {
    const { scrollHeight, clientHeight } = this.box;
    /* 위 코드에는 비구조화 할당(destructuring assignment) 문법이 사용되었습니다.
      다음 코드와 같은 의미입니다:
      const scrollHeight = this.box.scrollHeight;
      const clientHeight = this.box.cliengHeight;
    */
    this.box.scrollTop = scrollHeight - clientHeight;
  }


  render() {
    const style = {
      border: '1px solid black',
      height: '300px',
      width: '300px',
      overflow: 'auto',
      position: 'relative'
    };

    const innerStyle = {
      width: '100%',
      height: '650px',
      background: 'linear-gradient(white, black)'
    }

    return (
      <div
        style={style}
        ref={(ref) => { this.box=ref }}>
        <div style={innerStyle}/>
      </div>
    );
  }
}

export default ScrollBox;
ValidationSample.js
import React, { Component } from 'react';
import './ValidationSample.css';

class ValidationSample extends Component {
  state = {
    password: '',
    clicked: false,
    validated: false
  }

  handleChange = (e) => {
    this.setState({
      password: e.target.value
    });
  }

  handleButtonClick = () => {
    this.setState({
      clicked: true,
      validated: this.state.password === '0000'
    })
    this.input.focus();
  }

  render() {
    return (
      <div>
        <input
          ref={(ref)=>this.input=ref}
          type="password"
          value={this.state.password}
          onChange={this.handleChange}
          className={this.state.clicked && (this.state.validated ? 'success' : 'failure')}
        />
        <button onClick={this.handleButtonClick}>검증하기</button>
      </div>
    );
  }
}

export default ValidationSample;
ValidationSample.css
.success {
  background-color: lightgreen;
}

.failure {
  background-color: lightcoral;
}
App.js
import React, { Component } from 'react';
import ScrollBox from './ScrollBox';

class App extends Component {
  render() {
    return (
      <div>
        <ScrollBox ref={(ref) => this.scrollBox = ref}/>
        <button onClick={() => this.scrollBox.scrollToBottom()}>
          맨 밑으로
        </button>
        <ValidationSample/>
      </div>
    );
  }
}

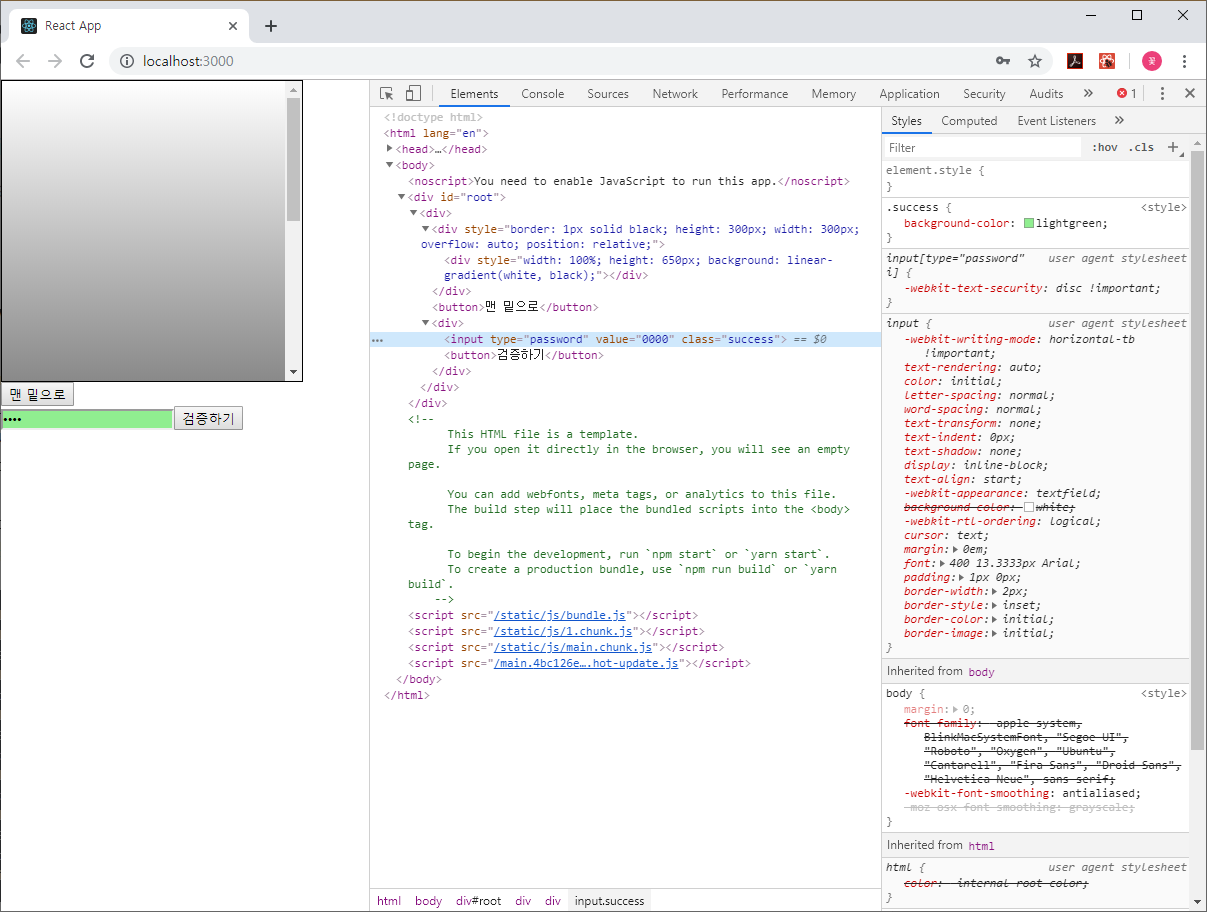
export default App;결과

onDoubleCLick 이벤트 + filter 메소드 + 배열 추가 (concat)
중요포인트
1. 컴포넌트 배열을 렌더링할 때는 key값 서정에 항상 주의 (key는 유일한 값)
2. 상태안에서 배열을 변형할 떄는 배열에 직접 접근하여 수정하는 것이 아니라 concat, slice, 전개 연산자, filter 함수 등을 사용해서 새로운 배열을 만든후, setState 메서드로 적용
IterationSample.js
import React, { Component } from 'react';

class IterationSample extends Component {

  state = {
    names: ['눈사람', '얼음', '눈', '바람']
  };

  handleChange = (e) => {
    this.setState({
      name: e.target.value
    });
  }

  handleInsert = () => {
    // names 배열에 값을 추가하고, name 값을 초기화합니다
    this.setState({
      names: this.state.names.concat(this.state.name),
      name: ''
    });
  }

  handleRemove = (index) => {
    // 편의상 name에 대한 레퍼런스를 미리 만듭니다
    const { names } = this.state;
    this.setState({
      // filter를 통해 index 번째를 제외한 원소만 있는 새 배열 생성
      names: names.filter((item, i) => i !== index)
    });
  }


  render() {
    const nameList = this.state.names.map(
      (name, index) => (
        <li
          key={index}
          onDoubleClick={() => this.handleRemove(index)}>
          {name}
        </li>
      )
    );


    return (
      <div>
        <input
          onChange={this.handleChange}
          value={this.state.name}/>
        <button onClick={this.handleInsert}>추가</button>
        <ul>
          {nameList}
        </ul>
      </div>

    );
  }
}

export default IterationSample;
App.js
import React, { Component } from 'react';
import IterationSample from './IterationSample';

class App extends Component {
  render() {
    return (
      <IterationSample/>
    );
  }
}

export default App;'WEB > REACT' 카테고리의 다른 글
| 6. 예제 - 일정관리 (0) | 2019.06.25 |
|---|---|
| 5. 리액트 컴포넌트 스타일링 방식 (0) | 2019.06.21 |
| 4. 컴포넌트의 라이플사이클 메서드 (0) | 2019.06.19 |
| 2. 컴포넌트 이해 & propTypes 활용 (0) | 2019.06.19 |
| 1.환경설정 (0) | 2019.06.19 |
